Friday, March 27, 2009

Premade Scrapbooks

Often times I've been asked how to fill a premade scrapbook album, so here it is:

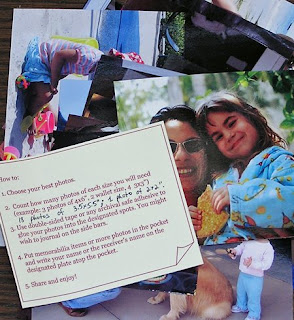
In every album I produce, I make sure to affix a 'How to' instruction card. You can follow the easy, step by step directions to get a complete, gorgeous scrapbook photo album. First step is to find the photos you want in that album, photos that will tell that specific story. You may choose to print different photos in different sizes, so you can fit more photos or create a 'spot light' on one single photo by printing it larger, making it the focal point of your story.

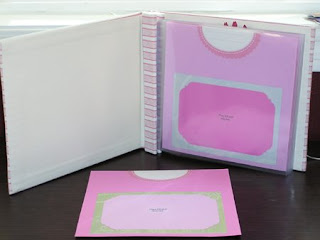
Choose a premade scrapbook album that fits your needs. If the colors of most of your photos are very vibrant and colorful (often happens with children's photos), better go with a subtle, multi hue color scheme, or a 3 color scheme that fits most, if not all, your photos. Also take note of journaling space if you're about to add that - where and how many words would fit?

In many of My Treasure Box albums we add photo frames you can use. Measure the inside of the window and see which one of your photos would fit best, both size-wise and location(where in the album is it? Does your photo fits front page? middle? last page? Is the size right for that photo?


As you can see, I chose to use Gaby's first brushing session for the window in Gaby's first years album. The focus is on Gaby and her tooth brush, and since it was taken at night, from afar, the small size is just right for this photo. In addition, the vibrant colors of the frame, matting and embellishments work well with the skin tones in the photo.

Some photos fit straight and nice, some need a little twist. Donald enjoyed the brushing and grooming as much as Gaby did!

Friday, March 20, 2009

Inspiration

I used to think everything should come from my head. Just pop up in my head whenever I asked it to. I was wrong. Indeed there are days when ideas are manifesting themselves pop corn style in my brain, but there are those other days, when I sit there, commanding my brain to blossom.... with no results. Now, you can either get grumpy about it or go find inspiration elsewhere, outside of your own brain's habitat. I go to the book store, go cruising other Internet sites and blogs, pick on a magazine rack, out to walk the dog (nature is a powerful stimulant) or go through my children's books. Children's books are so much more fun, visually, than ours - don't you think?

So here are my findings for today.

Modish has a great top banner. Jena, the blog writer, also have Flower for your Friday on her Flickr bit - such a great idea, so thankful you shared it, Jena!

Design*Sponge site is so clean and easy on the eye, it's just one of the most pleasant sites I've seen lately and the design elements keep accompanying you, creating a familiar 'neighbourhood' with each page you open. Their posts are interesting and so nicely put together it's always a joy to visit:)


Weeds and Wildflowers are on the happy side. Everything is colorful and jumpy and their layouts are gorgeous!


I hope to add pictures for you later this weekend:)

Have a great weekend and keep happy!

Wednesday, March 11, 2009

5 steps to creating the right scrapbook layout for you.

You may choose photos by viewing them on your desktop and printing only the ones you like (less expensive), or you can print out a 'contact sheet' to better see which photos are the ones you want. That way, you can cut out photos and play with the actual images on your table, matching them with various papers and embellishments.

2. Tell/show a story. Treat your album as if it was your personal magazine or book. What would you like to know about? What would be tedious and should be left out? What’s important to the story?
In this example, I knew already I had many photos I wanted to use to tell my story and wanted to keep it at one layout of 12x12", so I printed all my photos out at 2x3" sizes (wallet size).
Here I chose 8 photos that tell my story. There are still too many of them and I know already they won't fit into my layout, so I ordered them in the order of the story to look for duplicates or unnecessary photos. Those will eventually come out and I'll be left with only the most important photos, the ones that 'move the plot'.

3. The layout should upstage your photo. It should help your photo stand out, be the center of attention. If there’s too much glitz and glory
around, the eye gets tired and wonders off the page.

On the left are the photos paired with the various materials I'll use the make the final layout. I chose 'earthy', natural papers as the scene is our visit to the farm.

4. Use color to emphasize your photo. Use the color of attention in the photo - in your layout. Or, if the layout is very colorful, consider presenting the photo in black and white or sepia tones. In this case I used red for background as my daughter is weaing, and dark green to match my son's coat.

5. Use shape to focus. By repeating the same shape or angle in your photo, you will help viewers focus on the goings-on of the photo.

Here the bars of the cow's habitat are repeat in the corrugated cardboard to the left, the hey shapes are repeated on the background paper on the right and the roundness of the cow, plus the cow's eyes are repeated with the bicycle wheels and the matting patterned paper of the cow's photo, as well as the 'farming' title to the right.


    Materials credits: Background cardstock 'birthday' by MME; dotted cardstock princess by MME; Glitter cardstock by DCWV; Sticker letters by Memories Complete;Font: Calibri.

Friday, March 6, 2009

Which scrapbook album should I choose and why?

Choose your photo album cover design in accordance with the purpose of the photo album and the personality of its owner (example: school days - in the photo to the left, baby theme, photo in window or embellished cover).
Three ringed and post bound photo albums allow for page addition. Your family photo album will expend as your family memories accumulate.
Book-like binding are attractive, photo albums with sheet protectors are attractive and durable. On the right you can see the photos of the exposed posts that bind and keep the pages of this album together and a side view of the pages held together.
All photo album materials, pages, layouts and embellishments should be archival (both acid and lignin free) to keep photos from fading or yellowing with time.
Archival (non PVC) sheet protectors are recommended, to protect photographs from environmental damage and oils from human skin. When adhering photos to the layout, make sure to use only acid free (archival) adhesive to keep photos from discoloring and deteriorating with time.
In summery, choose a cover that works with your theme, choose album size that will work best with your subject and desired photo sizes. Use materials that are archival safe (acid and lignin free) to keep your photos from discoloring and use sheet protectors so viewers can point at their favorite photo without leaving their fingerprint on it. If your theme or subject is a growing/developing one (school years, baby, holidays through the years), start with an album that can expand later. Good luck!

Books I liked

  • A Tale of Love and Darkness by Amos Oz
  • Almost any book by David Grossman
  • Charlie and Lola books by Lauren Child
  • Clean and Simple Scrapbooking by Cathy Zeilske
  • Creation Companion by Betty Higins
  • Great Design Using Non Traditional Materials by Wendy Lyonsand Sheree Clarck
  • Handmade Cards by Anne Akers Johunson
  • Life Lines by Carol Wingert and Tena Sprenger
  • Like Water for Chocolate by Laura Esquivel
  • My Sister's Keeper by Jodi Picoult
  • People of The Book by Geraldine Brooks
  • People of the Book by Geraldine Brooks
  • Portrait in Sepia by Isabel Allende
  • The Book Thief by Marcus Zusak
  • Thinking of You by Making Memories

Followers

About Me

My photo
I'm a mom, community coordinator, event orgenizer, teacher, designer, crafter, wordster, foody, love beauty.